

Understanding Yellow Leaves on Tomato Plants
THE CAUSES & CURES OF YELLOW LEAVES ON TOMATO PLANTS!!!
TOMATO PLANT

Yellow leaves on tomato plants
There are plenty of reasons for the tomato leaves to turn yellow. Sometimes, it is natural and not a cause of worry, but all the other times, you need to pay attention. Yellowing leaves on tomato plants could indicate something as simple as too much water or something serious, for instance, a pest attack which could turn ugly.
Some of the factors that can turn your tomato leaves yellow include:
- Under or over-watering.
- Nutrient deficiencies.
- Pests or possible diseases transmitted through these pests.
Some of these are easy to fix while the rest could be a tad bit tricky to diagnose and treat. In some extreme cases, there is no saving the plant and you're going to have to get rid of it to prevent the problem from spreading across your garden.
If it's your first time growing tomatoes or if you've had problems in the past and issues such as the yellowing of the leaves are not a rare occurrence, I would highly recommend that you read my article on growing tomatoes from seed. This guide also works for you if you buy saplings as it covers the different stages of growth.
Through this article, we're going to be diagnosing the cause of one symptom, but the guide above would help you sort out your plants so that you would not be in the same situation with yet another problem further down the road, blossom end rot during fruiting season, for instance.
Why Do Tomato Leaves Turn Yellow?
| Cause | Solution |
|---|---|
|
Excess or deficient water |
Learn how to gauge how much water your plant needs (see below). |
|
Compacted soil |
Work to aerate the soil. |
|
Virus, fungus, or bacteria |
Read on for a complete list of solutions. |
|
Pests |
Below, you'll find the signs of and solutions for an infestation. |
|
Nutrient deficiencies |
It could be an imbalance of nitrogen, minerals, alkalinity, etc.... see below for diagnoses and solutions. |
|
Lack of sun |
If you can move the plant to get more sun, then do; if most of the plant is unaffected, don't worry about it. |
|
A normal stage of the growth cycle. |
Don't worry about it! |
1. Over Watering and Fusarium Root Rot
Tomato plants need perfect soil moisture levels. The soil shouldn’t be too wet nor too dry and it is important that the soil is dried out, but not too much before you water again. Determine how much water is needed by taking your weather conditions, the soil type, and the level of mulch you use into account. In some places, you'll need to water multiple times a day, but in others, watering just a few times a week is fine.
Read my guide on watering tomatoes for best techniques and precise quantities (for most gardens) needed for tomato plants which is applicable to most vegetables too.
Root Rot is one of the possible outcomes if you over-water potted tomato plants or if your garden has soil that does not drain well. When the roots of the plant are flooded for extended durations, they cannot breathe anymore. This lack of oxygen causes the plant tissue to die and eventually decay. The decayed sections of the root spread and in time results in the death of the plant. In addition to this, there is also the root rot fungus that can be dormant in the soil but is activated by just one instance of overwatering.
Is Your Plant Suffering from Root Rot?
Root rot is one of the problems that are usually observed too late and the plant in most cases cannot be saved. You can be sure that root rot is your culprit if you notice the following:
- The bottom leaves of the tomato plant have turned yellow indicating fusarium root rot.
- The stem just above the ground is brown, but not a mature brown (like wood) that may even go higher up the plant, instead it is a brown that is not firm and is very often mushy.
- If you notice a browning of the stem, you may want to slowly dig around the stem to see an inch or two below the soil. Do this carefully as you do not want to damage the plant (yet). Are you noticing this section is all wet and wrinkled like stale vegetables in the fridge? If yes, that's a clear sign of root rot.
Dealing with Root Rot
Unfortunately, your plant cannot be saved and it's going to die, eventually, unless you spotted the problem very early.
The culprit is the root rot fungus if you know for sure that your plant has never been consecutively over watered and that there was never heavy rainfall that resulted in stranded water around the plant.
The fungus is usually dormant and can live in the soil for a few years. As described earlier, it can be activated by just a single session of overwatering. On the contrary, natural root rot will not happen if your tomato plants are flooded just once for a few hours.
In cases where you are not sure of the cause or if you know for a fact that it was caused by the fungus, you're going to have to throw away the plant. Do not put it in a compost pile. Also, throw away all the soil from the container or dig up a decent amount of soil from your garden (where the plant stood) and throw it away. It would be wise to not use that part of your garden for a year or two or look into local root rot-resistant varieties. Also, clean up the tools you've used to dig up the plant, as the fungus can spread through your tools to the other parts of your garden.
Saving a Plant from Root Rot
If you're growing tomato plants in containers and if you happened to come here after noticing the yellowing of the bottom leaves, but none of the other problems described in this article seem to be the issue, you could have potentially caught root rot at the early stages where the roots have been damaged and are incapable of delivering the demanded amount of nutrients, thus causing the yellowing of the leaves. I suggest that you continue reading on and go through the entire article before you pull up your plant to investigate
Also, for it to be root rot, you would have to have over-watered your plants at least once or you would have to be using soil that was not sterile, to begin with. If these are not conditioning you could check off a list, the problem is something else entirely and it is very possible that I have not covered the issue, but it isn't root rot.
Once root rot is confirmed it's best to dig up the plant along with some soil so that the roots are intact and then wash the roots under gentle cold running water to get rid of all the soil. You may notice some of the decayed sections of the root fall off.
After carefully washing, use a shear to chop off any mushy black sections of the roots before washing again. Next place the roots in a gentle fungicide to kill the fungus causing the problem. It's best not to place the plant back into the same soil. Throw away the soil and wash the pot with bleach before adding new soil along with some compost/fertilizer.
I would also suggest that you chop off some leaves and branches to allow the plant to focus on growing roots rather than sending all the nutrients collected by the reduced root coverage up to the foliage.
2. Non-Aerated Soil
Non-Aerated soil or compact soil could be an issue. The first time I planted tomato plants, I placed tomato seeds in my garden and covered them up with a little soil. I did not loosen the soil underneath and had assumed it would be good enough considering that weeds and other plants grew pretty well. However, by the time the plants were a foot tall, the leaves began to turn yellow. After doing some initial research, way before I began writing this or any of my other tomato guides, I learned that compacted soil could be the issue.
Everything clicked, that was definitely a thing in my garden and compact soil is not the best medium for root propagation thus limiting the amount of nutrients the plants could reach which resulted in the supply being less than the demand and hence the yellow leaves which were a sign of nutrient deficiency.
So, if you've got compact soil, dig it up a bit being careful not to damage the roots close to the base of the plant. You may see a recovery just by doing this and nothing more.
3. Septoria Leaf Spot
Caused by the fungus Septoria Lycopersicon, it attacks the foliage with a vengeance. It is a very common problem and tends to portray itself in areas that have extended wet periods or generally humid weather. The only good thing here is the fact that it's easy to distinguish this occurrence of yellowing leaves.
It's a fungus that is not soil based. It can survive winters by just being on weeds or other members of the nightshade family, such as peppers. If you've had an outbreak, there's a good possibility that some of your gardening equipment would be carrying the spores of the fungi, too. High humidity and warm temperatures bring them out of dormancy.
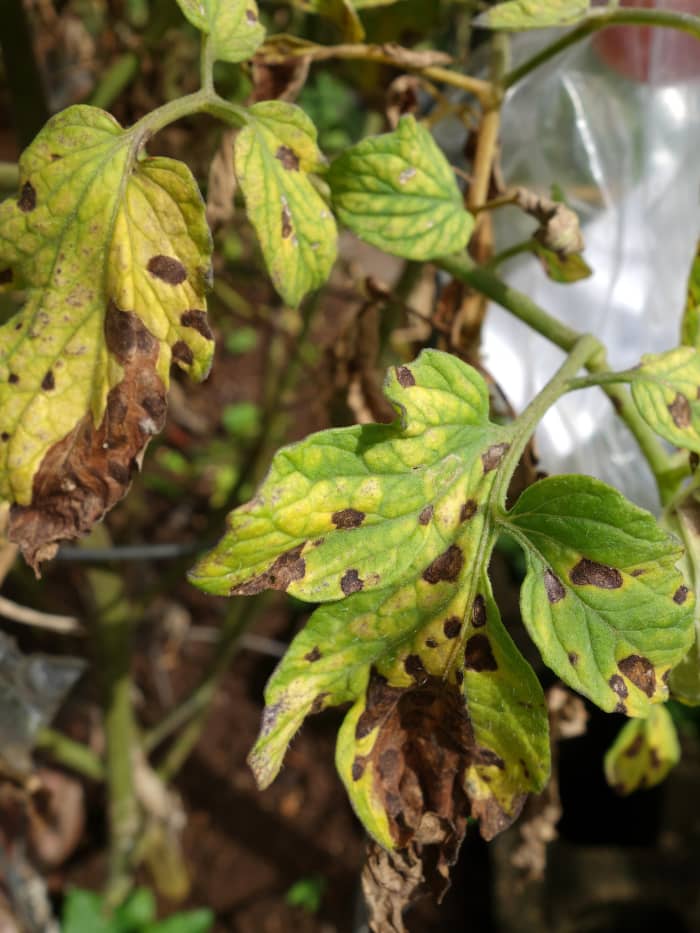
- They are circular spots, anywhere between a 16th to a quarter of an inch in diameter.
- The margins of the circular spots are dark brown, with lighter brown centers that may seem to be grey due to the color contrast.
- Spots even though individually distinguishable may be joined by yellowish regions.
- They typically spread upwards with the lower leaves being the first to be infected.
- In extreme cases, the leaves can even wither and die after the number of spots on a certain leaf increase.
Dealing with Septoria Leaf Spot
There are many ways to deal with Septoria leaf spots if the spots and yellowing of the leaves is detected early. These aren't options, but a list of things you need to do:
- Get rid of any diseased leaves and throw it away with your kitchen waste or better yet, burn the leaves that are infected and while at it, pick some of the leaves immediately above the damaged leaves, just in case some of the spores have already made their way up.
- Mulch helps prevent a splash of soil when you water or from raindrops. Very often the fungus resides on the surface and only gets to the plant through droplets that splash around. There are plenty of other benefits to mulching, as well. There's no excuse not to have some.
- Water on the ground and not from the top to be on the safer side, even if you've got mulch.
- The nightshade family are perfect hosts, so you'd want to get rid of any nightshade weeds in your garden.
- Do not let your plants leaves touch the ground, try stakes or cages. It also helps if you spread your tomato plants so that such infections do not spread easily.
4. Fusarium Wilt
This is a problem found across the globe and is caused by the soil borne pathogen Fusarium oxysporum. The fungus infects the plant through the root system and hampers the ability of the plant to absorb water resulting in the plant wilting, but only rarely dying.
Unlike many of the other issues that lead to yellow tomato leaves, this is one of the few where if left untreated the plant does not necessarily die and therefore gardeners keep trying to revive the plant without knowing the actual cause of the problem. It is therefore important that you are able to identify Fusarium Wilt when you see it.
Identifying Fusarium Wilt
- It begins with the lower leaves turning yellow and dropping with the problem climbing up the plant as the days go by.
- The plant will continue to seem wilted even though there is sufficient water in the soil.
- After prolonged periods, some leaves will begin to fall off.
Maintain soil at a pH of around 6.5, this ideal pH for tomato plants helps limit the fungus from setting root and taking over. If this is a problem that you've been seeing happen over and over again, you should look into varieties that are more resistant to this fungus. To the best of my knowledge, there are none that are completely immune.
The fungus can only enter a plant through damaged roots, therefore it is important that you prevent even small amount of root rot (first point in this list) and also be careful when digging up soil around the plant.
If you've got a plant that has already been attacked by this fungus, it's a futile attempt trying to save it. You'd just be putting all your time and effort into trying to revive it when in reality it won't really recover. The best thing to do is uproot the plant and burn it or dump it along with your waste, but not into a compost pit.
Early blight, a fungus called Alternaria solani, appears on the lowest, oldest leaves first. It looks like little brown spots with concentric rings that form a “bull’s eye." Eventually, the leaf turns yellow, withers, and dies. Treat as you would Septoria leaf spot.
Bacterial wilt, aka Ralstonia solanacearum, is a soil-borne bacterium common in moist, humid, sandy soils. It moves quickly up from the roots to the stem. Remove and burn the affected plant so the bacteria doesn't spread.
Verticillium wilt from Verticilliurn alboatrum, a soil-borne fungus that lives in many cool Northeast gardens. It starts as yellow patches on the low leaves and progresses to brown spots and curled, dead leaves. The best way to make sure that the plant is affected by Verticillium wilt is to chop off the branch that shows these symptoms and look for dark coloured rings. Unfortunately, the plant can't be saved, but the soil can be treated to prevent problems in the future.
- Nutrient Deficiencies. Macro and micro-nutrient deficiencies are a leading cause of yellow leaves in all plants, not just tomatoes. It does not necessarily mean that your soil is lacking—there are instances where the plant is simply incapable of absorbing nutrients. See below for more information.
Yellow Tomato Leaves Sometimes Indicate Nutrition Deficiency
- Absorption Difficulty (or Under-Watering): Tomato plants can absorb nutrients only through their roots. If this is prevented for any reason, then they are going to lack key nutrients. Water is the medium through which they absorb nutrients from the soil. Therefore, you need to ensure they get sufficient water, but not too much (see the point about excess moisture above).
- Imbalanced Alkalinity: Is your soil pH acidic or alkaline? Tomato plants need the right pH range for successful absorption of nutrients. You’ll need to add a little fertilizer, but don’t over-fertilize, which leads to high pH. I would recommend you read my guide on fertilizing tomatoes to know how to do it right based on the stage of growth.
- Lack of Nitrogen: When there's a deficiency of nitrogen, the older leaves at the bottom usually turn yellow whereas the upper, new leaves remain bright green as though there’s no problem at all. However, you’ll notice that the overall growth rate drops and your tomato plants will be shunted. You could add urea or ammonium to the soil or any other form of manure.
- Deficiency of Potassium: Here, the leaf as a whole doesn’t turn yellow, but the area between veins turns yellowish and the leaves may wilt. You could add potash to your soil.
- Calcium Deficiency: The growing tips of the plant may turn yellow and die within a few days. This is known as blossom end rot. Adding any compound containing calcium will work wonders.
- Lack of Magnesium: This will result in stunted growth and the outer edges of the leaves may become pale and yellow. Here the leaves seem to have a golden border. Another way this deficiency is exhibited is via small yellow spots that emerge on the green portions of the leaves (around the veins), these sections grow and merge leaving green veins with the rest of the leaf yellow. Eventually, the entire leaf would go yellow and wilt. Epsom salts are a good source of magnesium.
- Sulphur Deficiency: Do the new leaves look yellow but the older foliage remains fresh and green? Does the plant suffers from stunted growth? Add sulphur.
- Zinc Deficiency: Lack of zinc leads to the area between veins turning yellow, especially in the new leaves. This often leads to a bunch of small leaves at the top (a rosette).
All of these issues can easily be prevented if you amend the soil.
Yellow Leaves on Tomato Plants – Not Always a Cause of Worry
If you observe any plant, eventually you'll see the older leaves wilt and die. Similarly, your tomato plant will also have yellow leaves at the bottom. This is a normal stage of the growth cycle. Also it could indicate a lack of sunshine due to shading by the higher leaves. As long as the plant continues to grow healthily and produce fruits, you need not worry.
Diagnosing Tomato Leaf Problems
Why are there brown, gray, and yellow spots on my tomato plant's leaves?
This could indicate Septoria leaf spot, a soil-borne fungus that affects the leaves but not the fruit. It's a common issue with tomatoes, especially in wet, humid areas. It usually starts at the bottom of the plant with the oldest leaves and moves up. You might see darker spots surrounded by pale yellow areas that may eventually turn completely yellow or brown and die. If you look further up this article you will see a picture which you can use to help identify the problem you are facing.
What if the whole tomato leaf turns pale yellow?
Are older leaves turning yellow? This may not necessarily be a problem. You could check out the list of points already covered earlier. But, if the new leaf fonds open up to be yellowish, it's most likely a nutrient deficiency. Fungal attacks usually affect the entire plant at a time or go from the bottom to the top.
Why are the leaves on my tomato plants turning brown?
Tomato plant leaves do not begin by turning brown unless it's a fungal attack such as Septoria leaf spot or other fungal infections. So, if you notice your leaves turning brown before they go yellow you should look for a solution as soon as possible. The helpful points above are definitely going to help you out.
Why are the leaves dying?
The death of leaves on a plant is quite natural and not a reason to worry. The lower leaves that no longer receive sun light usually wilt and die as they are useless to the plant since they are just consumers and not producers. As long as you see some healthy foliage at the top of the plant you don't have to think twice about it
Source referred from Dengarden
And buy TOMATO SEEDS at Shop Tomato Fruits Seeds
Related collection
Explore Related Collections
Browse culinary and botanical collections related to this topic.
Browse Ingredient CollectionsProducts and collections are presented for general ingredient, culinary, botanical, craft, or gardening use. Content on this site is educational only and is not medical advice.


Leave a comment